Do you receive the Overtime Cook email newsletter? I send out a weekly menu plan, plus more. Click here to sign up. P.S – it’s completely free! This, to me, is the ultimate pesach dessert. Sure, it's got a few components to make, BUT - each of them is relatively easy, and they are all pesach staples that you'll find a hundred other uses for! Feel free to make just some of the components, such as the mousse, but the whole package is certainly an incredible showstopper! Did you know that I share cooking demos, menu plans, giveaways, and lots more exclusive content on Instagram? Follow me there for all that bonus content that you don’t want to miss! Like This Recipe? You … [Read more...]
Banana Butterscotch Bundt Cake

Do you receive the Overtime Cook email newsletter? I send out a weekly menu plan, plus more. Click here to sign up. P.S – it’s completely free! This cake wins a special award in my home: for the first time ever, it didn't make it through a whole shabbos. I found myself scrambling in the freezer to find another cake for the 30 women about to show up for a shabbos shiur. What can I say....it's just THAT good! Everyone who tried it was instantly hooked and BEGGED for the recipe. Well my friends, here it is! I'm excited to share this banana butterscotch Bundt Cake recipe with you - I know you will love it as well. A note about butterscotch pudding mix - this is available … [Read more...]
Honey Blueberry Bundt Cake

Do you receive the Overtime Cook email newsletter? I send out a weekly menu plan, plus more. Click here to sign up. P.S – it’s completely free! Blueberries in baked goods will always be one of my favorites, and this spectacular blueberry bundt with honey flavor infused throughout is definitely going to be a hit on your table as well! Did you know that I share cooking demos, menu plans, giveaways, and lots more exclusive content on Instagram? Follow me there for all that bonus content that you don’t want to miss! Like This Recipe? You will absolutely LOVE my cookbooks! They also make a great gift! Click here to purchase Something Sweet. Click here … [Read more...]
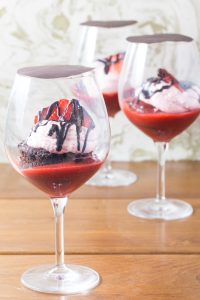
Chocolate Pomegranate Mousse

Do you receive the Overtime Cook email newsletter? I send out a weekly menu plan, plus more. Click here to sign up. P.S – it’s completely free! Looking for a great way to turn up the flavor of a basic chocolate mousse? This recipe is just what you're looking for! The flavor is definitely chocolate, but there is a tart, fruity note to the chocolate that makes this recipe truly fantastic. Whether you're making this for your rosh Hashanah meals, or dessert on any day of the year, you will love this easy and delightful dessert. Did you know that I share cooking demos, menu plans, giveaways, and lots more exclusive content on Instagram? Follow me there for all that bonus content that … [Read more...]
Strawberry Oatmeal Cookies

Strawberry Oatmeal Cookies are unique, bursting with flavor and so easy to make! Do you receive the Overtime Cook weekly menu plan email? Each week I send a full dinner menu for the week, plus other recipes and ideas that you don't want to miss! Click here to sign up. P.S – it’s completely free! If you've bored of typical cookies like chocolate chip, these Strawberry Oatmeal Cookies are going to be your new favorite! They are filled with delicious, fresh fruit flavor and so easy yo make! Get ready for some really happy eaters when you serve this. Did you know that I share cooking demos, menu plans, giveaways, and lots more exclusive content on Instagram? Follow me … [Read more...]
Strawberry Rosé Bundt Cake

Do you receive the Overtime Cook email newsletter? It’s full of recipes, kitchen tips, menus and more! Click here to sign up. P.S – it’s completely free! A while back, I published this recipe in my column in Mishpacha Magazine's Family Table. In that intro, I wrote that this might just be the best Bundt Cake recipe I have ever created. And let me tell you friends, I don't think it's an exaggeration to say that I have created hundreds of Bundt Cake recipes. So what makes this one the best? Well, it's hard to say where the magic really lies. Maybe it's in the delicate fruity taste of the cake? Maybe it's in the crazy-amazing texture? Maybe it's just so easy to put … [Read more...]
Lemon Berry Trifle

Lemon Berry Trifle is a bright and fresh dessert that's perfect any time of the year! Do you receive the Overtime Cook email newsletter? It’s full of recipes, kitchen tips, menus and more! Click here to sign up. P.S – it’s completely free! This dessert has a few components to make, but is well worth the effort. It’s such a beautiful, fresh desert, with an incredible array of flavor and texture! As a bonus, you can make it ahead and freeze it - just leave the fresh berries garnish for the last minute! Did you know that I share cooking demos, menu plans, giveaways, and lots more exclusive content on Instagram? Follow me there for all that bonus content that you don’t want to … [Read more...]
Cherry Cheese Muffins

Cherry Cheese Muffins are easy to make and a deliciously decedent dairy treat! Do you receive the Overtime Cook email newsletter? It’s full of recipes, kitchen tips, menus and more! Click here to sign up. P.S – it’s completely free! Is this a muffin? Is it a cheesecake? Honestly, it's both! It's the best of both worlds, with a cheesecake infused muffin batter, a graham cracker crust at the bottom, and a cherry topping! Want to switch it up? Instead of cherry, use your choice of fruit pie filling, or you can top it with caramel sauce or fudge sauce, then some toppings like nut brittle, chocolate candies, or candied nuts. Whatever you top these with, they'll be … [Read more...]
Perfect Homemade Apple Pie
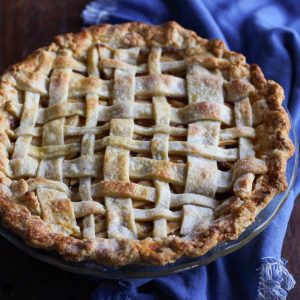
Do you receive the Overtime Cook email newsletter? It’s full of recipes, kitchen tips, menus and more! Click here to sign up. P.S – it’s completely free! To me, nothing screams "homemade with love" more than a perfect, flakey apple pie. This incredible dessert is great for Rosh Hashanah, fall, or seriously any time. You'll wow your family and friends and have a fun time making it! Did you know that I share cooking demos, menu plans, giveaways, and lots more exclusive content on Instagram? Follow me there for all that bonus content that you don’t want to miss! Like This Recipe? You will absolutely LOVE my cookbooks! They also make a great gift! Click here … [Read more...]
Apple Oatmeal Bars with Honey Caramel Sauce

Do you receive the Overtime Cook email newsletter? It’s full of recipes, kitchen tips, menus and more! Click here to sign up. P.S – it’s completely free! These fall-inspired bars are super versatile. You can serve them plain, straight from the pan, as an everyday treat. Serve them warm, topped with Honey Caramel Sauce (see below) and a scoop of vanilla ice cream or a dollop of whipped cream for an elegant, flavorful, and comforting Yom Tov or Shabbos dessert. Did you know that I share cooking demos, menu plans, giveaways, and lots more exclusive content on Instagram? Follow me there for all that bonus content that you don’t want to miss! If you want, you can top … [Read more...]
- 1
- 2
- 3
- …
- 5
- Next Page »