
Do you receive the Overtime Cook email newsletter? I send out a weekly menu plan, plus more. Click here to sign up. P.S – it’s completely free! Meringues and Pesach are a perfect fit, because they’re naturally free of chometz. These gorgeous cookies take the classic meringue up a notch, with two delicious flavors swirled together in one pretty cookie. If you prefer (or want to save time) you can do just one of these flavors—each are delicious on their own, too. Did you know that I share cooking demos, menu plans, giveaways, and lots more exclusive content on Instagram? Follow me there for all that bonus content that you don’t want to miss! Like This … [Read more...]
Flourless Fudge Cookies {passover and gluten-free}
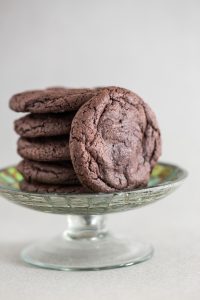
Do you receive the Overtime Cook email newsletter? I send out a weekly menu plan, plus more. Click here to sign up. P.S – it’s completely free! This is THE pesach chocolate cookie - it's simple and easy to make, with the kind of texture that will have you coming back for more and more! Did you know that I share cooking demos, menu plans, giveaways, and lots more exclusive content on Instagram? Follow me there for all that bonus content that you don’t want to miss! Like This Recipe? You will absolutely LOVE my cookbooks! They also make a great gift! Click here to purchase Something Sweet. Click here to purchase Real Life Kosher Cooking Click here to … [Read more...]
Strawberry Chocolate Mousse Cups {Passover}
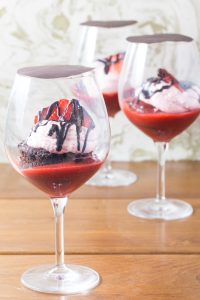
Do you receive the Overtime Cook email newsletter? I send out a weekly menu plan, plus more. Click here to sign up. P.S – it’s completely free! This, to me, is the ultimate pesach dessert. Sure, it's got a few components to make, BUT - each of them is relatively easy, and they are all pesach staples that you'll find a hundred other uses for! Feel free to make just some of the components, such as the mousse, but the whole package is certainly an incredible showstopper! Did you know that I share cooking demos, menu plans, giveaways, and lots more exclusive content on Instagram? Follow me there for all that bonus content that you don’t want to miss! Like This Recipe? You … [Read more...]
Coffee Caramel Mousse with Chocolate Praline Crumbs {Passover and Gluten Free}
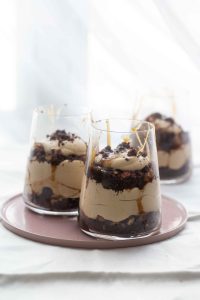
Do you receive the Overtime Cook email newsletter? I send out a weekly menu plan, plus more. Click here to sign up. P.S – it’s completely free! Calling all coffee lovers! If you love the thought of a caramel iced latte, this dessert is exactly for you! It's got wonderful flavors of coffee and caramel, plus a texture party with the most delicious crumbs you can imagine! This is a kosher for passover recipe, but I suspect you'll keep making it all year long! Did you know that I share cooking demos, menu plans, giveaways, and lots more exclusive content on Instagram? Follow me there for all that bonus content that you don’t want to miss! Like This Recipe? You will … [Read more...]
Thin and Crispy Chocolate Gelt Cookies
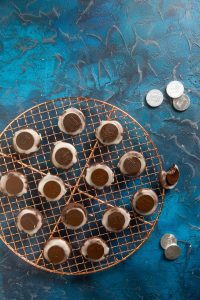
Do you receive the Overtime Cook email newsletter? I send out a weekly menu plan, plus more. Click here to sign up. P.S – it’s completely free! Did you know that I share cooking demos, menu plans, giveaways, and lots more exclusive content on Instagram? Follow me there for all that bonus content that you don’t want to miss! Like This Recipe? You will absolutely LOVE my cookbooks! They also make a great gift! Click here to purchase Something Sweet. Click here to purchase Real Life Kosher Cooking Click here to purchase More Real Life Kosher Cooking Click here to purchase Real Life Pesach Cooking Never miss a new recipe! Follow me for all the updates … [Read more...]
Chocolate Pomegranate Mousse

Do you receive the Overtime Cook email newsletter? I send out a weekly menu plan, plus more. Click here to sign up. P.S – it’s completely free! Looking for a great way to turn up the flavor of a basic chocolate mousse? This recipe is just what you're looking for! The flavor is definitely chocolate, but there is a tart, fruity note to the chocolate that makes this recipe truly fantastic. Whether you're making this for your rosh Hashanah meals, or dessert on any day of the year, you will love this easy and delightful dessert. Did you know that I share cooking demos, menu plans, giveaways, and lots more exclusive content on Instagram? Follow me there for all that bonus content that … [Read more...]
Chocolate Fluff Mousse

Do you receive the Overtime Cook email newsletter? It’s full of recipes, kitchen tips, menus and more! Click here to sign up. P.S – it’s completely free! Confession: I made this chocolate mousse because I am on a mission to clear out my pantry. I knew I wanted to make mousse of some kind, so I went to my pantry to see what I could find. And that's when I found a container of marshmallow fluff. The wheels in my brain started turning, and I came up with this incredible dessert. The incredible thing about this recipe is the fantastic, pillowy texture that the marshmallow fluff gives this mousse. The other cool thing about this recipe is that there is an insanely rich chocolate … [Read more...]
S’mores Hot Chocolate

Do you receive the Overtime Cook email newsletter? It’s full of recipes, kitchen tips, menus and more! Click here to sign up. P.S – it’s completely free! Whether the cold winter weather is starting to get to you, or you're just in the mood for a warm and comforting drink, this S'mores Hot Chocolate is exactly the treat you need! It'll warm you up and make you very happy. Did you know that I share cooking demos, menu plans, giveaways, and lots more exclusive content on Instagram? Follow me there for all that bonus content that you don’t want to miss! Like This Recipe? You will absolutely LOVE my cookbooks! They also make a great … [Read more...]
Sheet Pan Chanukah Gelt Cookies

Do you receive the Overtime Cook email newsletter? It’s full of recipes, kitchen tips, menus and more! Click here to sign up. P.S – it’s completely free! Sheet pan chanukah gelt cookies are the easiest ever version of a b If you've been here since the very beginning, in December 2011 (there were probably about 30 of you back then!) you might already know this. But for the rest of you, here's a fun story. 12 years ago, I invented the original chanukah gelt cookies trend. It was a totally new idea, so I didn't even coin the phrase "chanukah gelt cookies" until I made a second version, a year later. In the years since, I, as well as so many others, have gotten inspired by it … [Read more...]
Neapolitan Medallion Cupcakes

Do you receive the Overtime Cook email newsletter? It’s full of recipes, kitchen tips, menus and more! Click here to sign up. P.S – it’s completely free! If you’ve seen these adorable and beautiful medallion cupcakes at simchas, know that chocolate coins are the easiest way to make this beautiful treat at home, in minutes. (You’ll find yourself using this cupcake recipe again and again - it’s impossibly fluffy and so flavorful!) Did you know that I share cooking demos, menu plans, giveaways, and lots more exclusive content on Instagram? Follow me there for all that bonus content that you don’t want to miss! Like … [Read more...]
- 1
- 2
- 3
- …
- 10
- Next Page »