
Do you receive the Overtime Cook email newsletter? I send out a weekly menu plan, plus more. Click here to sign up. P.S – it’s completely free! One of the most incredible appetizer recipes from my cookbook, Real Life Pesach Cooking, is my pastrami fritters. They're insanely crispy, super tasty, and just such a crowd pleaser! When my sister, who is allergic to mushrooms, asked me for a new appetizer idea for pesach, these pastrami fritters came into existence! They're easy to make, so delicious, and a guaranteed hit at your pesach table! Did you know that I share cooking demos, menu plans, giveaways, and lots more exclusive content on Instagram? Follow me there for all that bonus … [Read more...]
Ultimate Pesach Vanilla Cake from Real Life Pesach Cooking {gluten free}
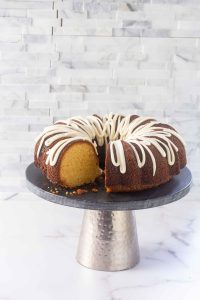
Do you receive the Overtime Cook email newsletter? I send out a weekly menu plan, plus more. Click here to sign up. P.S – it’s completely free! This is probably the number one most popular recipe from my cookbook, Real Life Pesach Cooking, and for good reason! It's got the most incredible can't-believe-it's-not-chometz texture, it's easy to make, and it's just so deliciously tasty. What's not to love? I figured it's time to give it a spot here on my blog, so here we go! Enjoy! Tip: For a chocolate cake, replace the vanilla pudding mix with chocolate pudding mix. Or make one of each and marble them together. Did you know that I share cooking demos, menu plans, … [Read more...]
Coffee and Chocolate Swirled Meringues

Do you receive the Overtime Cook email newsletter? I send out a weekly menu plan, plus more. Click here to sign up. P.S – it’s completely free! Meringues and Pesach are a perfect fit, because they’re naturally free of chometz. These gorgeous cookies take the classic meringue up a notch, with two delicious flavors swirled together in one pretty cookie. If you prefer (or want to save time) you can do just one of these flavors—each are delicious on their own, too. Did you know that I share cooking demos, menu plans, giveaways, and lots more exclusive content on Instagram? Follow me there for all that bonus content that you don’t want to miss! Like This … [Read more...]
Flourless Fudge Cookies {passover and gluten-free}
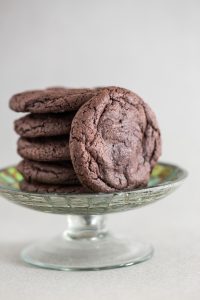
Do you receive the Overtime Cook email newsletter? I send out a weekly menu plan, plus more. Click here to sign up. P.S – it’s completely free! This is THE pesach chocolate cookie - it's simple and easy to make, with the kind of texture that will have you coming back for more and more! Did you know that I share cooking demos, menu plans, giveaways, and lots more exclusive content on Instagram? Follow me there for all that bonus content that you don’t want to miss! Like This Recipe? You will absolutely LOVE my cookbooks! They also make a great gift! Click here to purchase Something Sweet. Click here to purchase Real Life Kosher Cooking Click here to … [Read more...]
Strawberry Chocolate Mousse Cups {Passover}

Do you receive the Overtime Cook email newsletter? I send out a weekly menu plan, plus more. Click here to sign up. P.S – it’s completely free! This, to me, is the ultimate pesach dessert. Sure, it's got a few components to make, BUT - each of them is relatively easy, and they are all pesach staples that you'll find a hundred other uses for! Feel free to make just some of the components, such as the mousse, but the whole package is certainly an incredible showstopper! Did you know that I share cooking demos, menu plans, giveaways, and lots more exclusive content on Instagram? Follow me there for all that bonus content that you don’t want to miss! Like This Recipe? You … [Read more...]
Savory Carrot Kugel Muffins {Passover and Gluten Free}
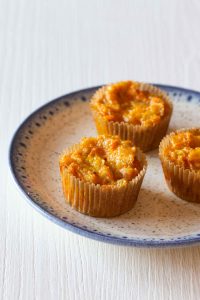
Do you receive the Overtime Cook email newsletter? I send out a weekly menu plan, plus more. Click here to sign up. P.S – it’s completely free! If you’ve ever thought of carrot muffins as somewhere between a side dish and dessert , this version will totally change your thinking. These are decidedly kugel - not dessert muffins. They have just the slightest hint of sweetness and lots of savory flavors of onion and ginger to make them as tasty as they are convenient! Did you know that I share cooking demos, menu plans, giveaways, and lots more exclusive content on Instagram? Follow me there for all that bonus content that you don’t want to miss! Like This Recipe? … [Read more...]
Coffee Caramel Mousse with Chocolate Praline Crumbs {Passover and Gluten Free}
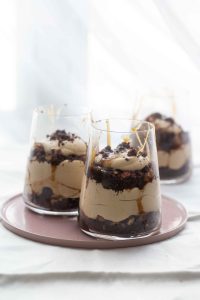
Do you receive the Overtime Cook email newsletter? I send out a weekly menu plan, plus more. Click here to sign up. P.S – it’s completely free! Calling all coffee lovers! If you love the thought of a caramel iced latte, this dessert is exactly for you! It's got wonderful flavors of coffee and caramel, plus a texture party with the most delicious crumbs you can imagine! This is a kosher for passover recipe, but I suspect you'll keep making it all year long! Did you know that I share cooking demos, menu plans, giveaways, and lots more exclusive content on Instagram? Follow me there for all that bonus content that you don’t want to miss! Like This Recipe? You will … [Read more...]
Onion Stuffed Chicken Capons
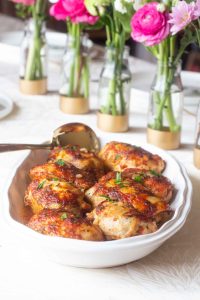
Do you receive the Overtime Cook email newsletter? I send out a weekly menu plan, plus more. Click here to sign up. P.S – it’s completely free! I'm always a fan of a good chicken capon (boneless chicken leg) recipe - they are juicy and tender and can even be prepared ahead and frozen! This family-friendly recipe looks elegant, but it's got a delectable filling of onions and potato - who wouldn't love that? Did you know that I share cooking demos, menu plans, giveaways, and lots more exclusive content on Instagram? Follow me there for all that bonus content that you don’t want to miss! Like This Recipe? You will absolutely LOVE my cookbooks! They also … [Read more...]
Crispy Coffee Cookie Brittle {for Passover}
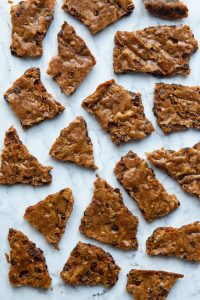
Do you receive the Overtime Cook email newsletter? I send out a weekly menu plan, plus more. Click here to sign up. P.S – it’s completely free! One of my absolute favorite, and possibly the most underrated recipe in my most recent cookbook, Real Life Pesach Cooking, is this recipe for Crispy Coffee Cookie Brittle. It's the kind of deliciously addictive cookie that passover 0r not, I w0uld happily enj0y, every single day of the year! If y0u're always chasing a thin and crispy cookie recipe, this is the one for you! Did you know that I share cooking demos, menu plans, giveaways, and lots more exclusive content on Instagram? Follow me there for all that bonus content that … [Read more...]
Mini Caramelized Onion and Cabbage Kugels

Do you receive the Overtime Cook email newsletter? I send out a weekly menu plan, plus more. Click here to sign up. P.S – it’s completely free! There's something so yummy and addictive about the sweet and savory combination of caramelized onion and cabbage - I've used it in many forms, but in this kugel, it takes center stage! This freezer-friendly side dish is a kosher for pesach recipe, but it's so good, you'll be eating it all year long! Did you know that I share cooking demos, menu plans, giveaways, and lots more exclusive content on Instagram? Follow me there for all that bonus content that you don’t want to miss! Click here for lots more amazing passover … [Read more...]
- 1
- 2
- 3
- …
- 66
- Next Page »